Calibrate Dynamic Limits for Reliable Trajectory Tracking
Both the Stretch Python API and the stretch_ros2 package offer the ability to have Stretch track spline trajectories defined by joint waypoints. This can be valuable for coordinated whole-body movements, like the trajectories generated by most motion planners. Recently, we fixed a series of bugs and edge cases around trajectory tracking. Today, we’re releasing a new CLI to calibrate your Stretch’s dynamic limits for each kind of spline.
Out of the box, Stretch’s dynamic limits are uncalibrated and quite generous - meaning you might send a trajectory that looks fine, but causes the robot to stutter or trigger guarded contact protection mid-motion, halting unexpectedly, as shown in Figure 1.
Figure 1: A screenshot of the Stretch Trajectory Jog tool accepting an Arm trajectory, but failing to execute it after 1 second due to guarded contacts triggering.
To solve this, we’ve developed a Trajectory Dynamic Limit Calibration tool. This calibration script moves the joints iteratively until they reach 80% motor effort or 1cm goal error, whichever happens sooner.
This is the Trajectory Dynamic Limit Calibration process:
-
Moves each joint through linear, cubic, and quintic motion profiles.
-
Iteratively increases the motion constraints until the motor hits either 80% of its effort limit or 1cm position error - whichever occurs first.
-
Automatically backtracks and fine-tunes to find safe maximum velocities and accelerations in both positive and negative directions.
-
Saves the calibrated limits to your stretch_user folder and updates stretch_configuration_params.yml for future runs.
Here’s how to get started:
- Upgrade your Stretch Factory package:
pip3 install -U hello-robot-stretch-factory
- Run the calibration script:
REx_calibrate_trajectory_limits.py
Note: The full calibration can take up to 10 minutes per joint.
Example of the output (calibrated parameters written to YAML):
arm:
  motion:
    trajectory_max:
      cubic:
        negative:
          accel_m: 0.1999
          vel_m: 0.1324
        positive:
          accel_m: 0.2341
          vel_m: 0.1348
      linear:
        negative:
          accel_m: 0.6464
          vel_m: 0.0750
        positive:
          accel_m: 1.0593
          vel_m: 0.1284
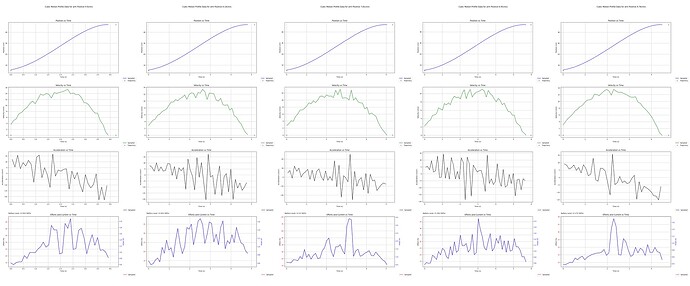
Graph outputs are also generated to visualize motion profiles and motor effort:
Figure 2: Graphs of Cubic motion profile generated during calibration.
With these calibrated values:
-
The robot pre-checks your trajectory during the follow_trajectory() call.
-
If your requested trajectory exceeds the calibrated limits, you’ll get an early warning.
Example warning during a trajectory check:
[WARNING] [arm]: Joint traj not valid: segment 0 from 0.05 -> 0.5 exceeds dynamic bounds (velocity | acceleration) with max of (0.23 | 0.32)
How to use Waypoint Trajectories:
If you want to take full advantage of trajectories with your Stretch, both the Stretch Python API and stretch_ros2 package allow you to define waypoint-based trajectories with velocity and acceleration constraints.
You can use the Trajectory Jog tool on your Stretch by running stretch_trajectory_jog.py from a terminal on the robot. This will open up an interface that looks like Figure 3:
Figure 3: A screenshot of the Stretch Trajectory Jog tool.
Quick example using the Stretch Python API for a prismatic joint (like the arm or lift):
First, update your Python libraries. Then, run the following code in the Python REPL:
import stretch_body.robot

robot = stretch_body.robot.Robot()

robot.startup()

joint = robot.lift

current_position = joint.status["pos"]

joint.trajectory.clear()

joint.trajectory.add(t_s=0.0, x_m=current_position, v_m=0.0, a_m=0.0)

joint.trajectory.add(t_s=10.0, x_m=0.4, v_m=0.0, a_m=0.0)

joint.pull_status()

if not robot.follow_trajectory(move_to_start_point=True):
    raise Exception("Failed to start trajectory.")
For the mobile base:
joint = robot.base

joint.trajectory.clear()

joint.trajectory.add(time=0.0, x=0.0, y=0.0, theta=0.0, translational_vel=0.0, rotational_vel=0.0, translational_accel=0.0, rotational_accel=0.0)

joint.trajectory.add(time=10.0, x=0.4, y=0.0, theta=0.0, translational_vel=0.0, rotational_vel=0.0, translational_accel=0.0, rotational_accel=0.0)

joint.pull_status()

if not robot.follow_trajectory():
    raise Exception("Failed to start trajectory.")
In ROS2, you can switch to Trajectory Mode via:
- ros2 service call /switch_to_trajectory_mode std_srvs/srv/Trigger
And plan trajectories with tools like stretch_trajectory_planner, then send them using the FollowJointTrajectory action interface. Be sure to update your ROS workspace.
For more information on Linear, Cubic and Quintic motion profiles, check out the ROS2 docs.


