Suppose you wanted to program Stretch to draw a perfect circle. Like this:

You might put Stretch in front of a whiteboard and hand it a marker.

You need some points on a circle, and fortunately, numpy makes this easy to calculate.
def draw_circle(n, diameter_m=0.2):
    t = np.linspace(0, 2*np.pi, n, endpoint=True)
    x = (diameter_m / 2) * np.cos(t) + arm_init
    y = (diameter_m / 2) * np.sin(t) + lift_init
    circle_mat = np.c_[x, y]
Next up, Stretch needs to move it’s arm and lift joints to the points in circle_mat. We’ll do this by importing Stretch Body, creating a robot called r, and using the r.<arm/lift>.move_to() methods.
import stretch_body.robot
r = stretch_body.robot.Robot()
r.startup()

def draw_circle(n, diameter_m=0.2):
    t = np.linspace(0, 2*np.pi, n, endpoint=True)
    x = (diameter_m / 2) * np.cos(t) + arm_init
    y = (diameter_m / 2) * np.sin(t) + lift_init
    circle_mat = np.c_[x, y]
    for pt in circle_mat:
        r.arm.move_to(pt[0])
        r.lift.move_to(pt[1])
        r.push_command()
        time.sleep(1.5)
If you ran this with 10 points sampled from the circle (n=10), you would get:
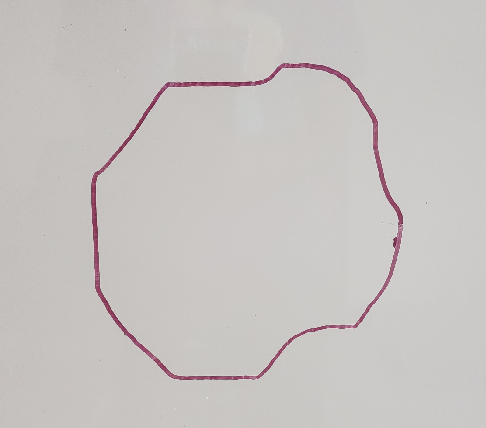
This is not a very good circle. Perhaps we would get a better circle if we sampled more points:
Notice a few things:
- The circle does get better as we sample more points!
- Unfortunately, so the length of time it takes to draw the same circle (>1min for the last circle!)
- The arm and lift joints do not move in unison
- The whole motion is jerky. The robot pauses before moving to the next point.
We’ve discovered some of the limitations of “Position mode”, the mode the robot is in when you use the move_to() or move_by() methods, or use position mode in Stretch ROS.
It would be nice if we could draw a nice smooth circle in one quick motion. Turns out, we can do this using “Trajectory mode”. This is a mode that gives us control over the timing for a joint as it follows a series of points (a.k.a. a trajectory). This allows us to move the arm and lift in coordination with one another and without needing to pause at each point.
def draw_circle_trajectory(n, diameter_m=0.2):
    t = np.linspace(0, 2*np.pi, n, endpoint=True)
    x = (diameter_m / 2) * np.cos(t) + arm_init
    y = (diameter_m / 2) * np.sin(t) + lift_init
    circle_mat = np.c_[x, y]
    time_dt = 15 / n
    for i in range(n):
        pt = circle_mat[i]
        pt_t = i * time_dt
        r.arm.trajectory.add(t_s=pt_t, x_m=pt[0])
        r.lift.trajectory.add(t_s=pt_t, x_m=pt[1])
    r.follow_trajectory()
    time.sleep(n * time_dt + 0.5)
Notice how each circle takes 15 seconds to draw, regardless of the number of points sampled. This is done by dividing the total time, 15 seconds, by the number of points sampled. Then, when adding point to the trajectory using r.<arm/lift>.trajectory.add(t_s=<time>, x_m=<goal>), you can use the points index, i, and the time delta, time_dt, to calculate when the robot should achieve that point. A tutorial with more details on Trajectory mode is available here and the API for Trajectory mode is documented here.
Comparing the circles (n=10) produced by Position and Trajectory modes, the difference is stark.
In the next clip, we’re comparing 200 points for Position mode and 50 points for Trajectory mode. The results are comparable.
In summary:
- You can get smooth motion out of the robot using Trajectory mode
- You can get coordinated motion of the robot using Trajectory mode
- The trajectory API is available for every joint on the robot, including the mobile base, which is given SE2 waypoints constituting a Balkcom-Mason trajectory.
The code snippets in this post are part of a Python program called draw_circle.py. For those interested in using the Trajectory mode in ROS2, here’s the same program converted to a ROS2 node.
Happy circle drawing!